This tutorial will cover the installation and setup of the VTI World Kit for usage in creating VRChat Worlds that support VRChat Twitch Integration (For Worlds!). It is the first tutorial in the developer series, and will include the process to get a World to connect to the VTI Companion App. This tutorial will assume basic knowledge on setting up VRChat Worlds and will not cover that topic.
The VTI World Kit can be found here: https://stevegreendesign.com/project/vti/
Step 1: Installing VTI
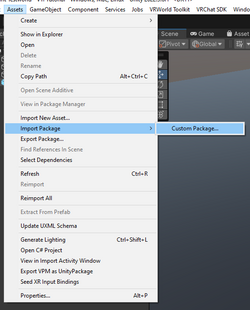
Once you have the VTI World Kit downloaded, install the .unitypackage file like you would any other package. Navigate to Assets > Import Package > Custom Package... and select the VTI World Kit package. This will add all the VTI assets under Assets/Poetica Mechanica/.
Open the folder Poetica Mechanica/VRC Twitch Integration/Prefabs/, and drag the VRChat Twitch Integration.prefab prefab into the scene. This is the "Core" of the VTI World Kit and has all the components necessary to run VTI.
Step 2: Configure World Settings

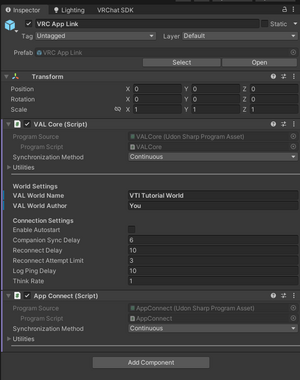
We now need to configure some settings in order to get things working. Select the GameObject VRChat Twitch Integration/VRC App Link. Change the VAL World Name and VAL World Author to what you want your World to display when connecting the VTI Companion App to it.
Note: VAL World Name is used when saving and loading World Settings for a VTI-Capable World. If this name matches another VTI-Capable World, the VTI Companion App will consider it to be the same world and attempt to load settings accordingly. This can be handy if you have multiple versions of your World (like a Beta/Release setup, or A/B Channel builds), but it is also worth ensuring the world name is unique enough to not trip up the user. TL;DR, don't name your world "World".
Connection Settings
Below the World Settings, you can see the Connection Settings section. For the most part it is safe to leave these all default. However, for completeness, here are what each of these settings do:
| Setting | Usage |
|---|---|
| Enable Autostart | When Enabled, VTI will attempt to connect to the VTI Companion App immediately rather than waiting for the user to connect. |
| Companion Sync Delay | How often, in seconds, to attempt to get updates from the VTI Companion App. This is defaulted to 6 seconds, and clamps itself to 5.1 seconds at a minimum, due to how Remote String Loading is rate-limited. |
| Reconnect Delay | In the event of a connection failure, how many seconds to wait before attempting to reconnect to the VTI Companion App |
| Reconnect Attempt Limit | How many attempts are made to connect before giving up. |
| Log Ping Delay | If the VTI Companion App is left in WAIT_LOG for this many seconds, this will write a bunch of data to the Debug Log to try to wake it up. Repeats. Best to just leave this at 10 seconds.
|
| Think Rate | How often the VTI World Kit will "think" and process inputs. Lower numbers "think" more often, which is more responsive but less efficient. |
VTI Core Settings

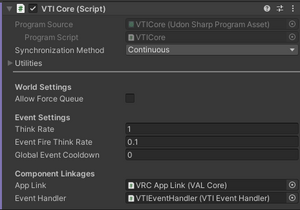
Neighboring the VRC App Link GameObject is the VTI Core object. Select this and note the settings in the Inspector. Like the previous section, these are fine to leave as default. But for your information, here is what each setting does:
| Setting | Usage |
|---|---|
| Allow Force Queue | Whether or not to allow the VTI Companion App to force an event to trigger. Useful for debugging, but can break Game worlds. |
| Think Rate | Much like above, how fast this component will "think". Lower numbers are more responsive, but incur a heavier performance cost. |
| Event Fire Think Rate | Similar to the above, but an extra kick to the processing speed when VTI is attempting to fire off an Event. Useful for reducing delay when multiple VTI users are in the same world together and VTI is waiting on Ownership. |
| Global Event Cooldown | If you wish to rate-limit the number of Events cooking off, you can put in an extra delay in seconds here. |
Step 3: Place Control Panel(s)
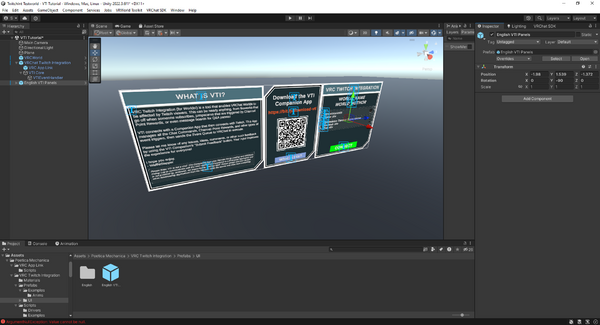
The final thing we need to do to get this world to connect to the VTI Companion App is to place down one of the Control Panel prefabs. Navigate to the asset folder Poetica Mechanica/VRC Twitch Integration/Prefabs/UI/ and drag the English VTI Panels.prefab prefab into the scene.
Note: More languages are planned to be supported in the future. When they are, choose the VTI Panels prefab matching the language you wish to use.
This prefab contains three panels: the main Control Panel, a Download VTI panel, and a "What Is VTI?" panel. The Control Panel has the actual functionality we need, namely the Connect button. The other two are useful to let your users know about VTI and how to get it and are best placed in the Spawn Area of your World. If you wish to place more Control Panels around your world without the other two auxiliary panels, head into the English/ (or whichever language) asset folder and drag another Control Panel prefab into the scene.
The VTI World Kit supports any number of Control Panels, and there are no extra links to manually make. Drop as many Control Panels into the World as you wish!
Closing
And that's it! You can test if everything is setup correctly by building your World, launching the Companion, and clicking the Connect button on any Control Panel. If the Companion connects and all the lights on the Control Panel are green, you're done!
However, this World doesn't really do anything yet. To make it do stuff, continue onto the next tutorial and read Creating VTI Targets.

