This article is a tutorial on how to use the VTI World Kit portion of VRChat Twitch Integration (For Worlds!) in order to create your own triggerable VTI Targets. This will be a codeless tutorial, as most basic Targets can be handled by the built-in Driver Scripts included with the World Kit.
This tutorial assumes that you already have the VTI World Kit setup in your scene. If you have not, please see VTI World Kit Setup.
Step 1: Design and Driver Selection
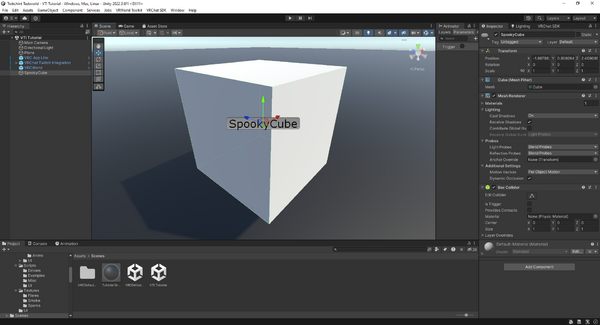
The first step of every new Target that you want to make is, of course, figuring out what you want it to do. In the case of this tutorial, we have ourselves an object that we'd like to have appear in the scene: a Spooky Cube that will most certainly jumpscare the Streamer. We want it to show up, wait a short while, and then vanish once again.
With all that in mind, we can now go and select ourselves the most fitting Driver for this application. Knowing that this cube doesn't have any special animations or interactions that we need to deal with, we can see that all we have to do is toggle the object's Active state. The Driver that is best for this job would be VTIObjectToggle.
Step 2: Setting Up The Target
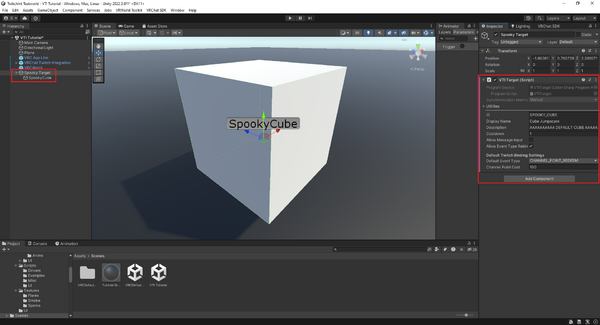
Now that we have our design ideas done, we can start creating the actual Target. To do this, we first need to actually make the Target. Create a new Empty in the scene, and name it something easy to find, perhaps something with the word "Target" in it. Next, attach the VTI Target component onto this Empty.
To make this nice and modular, so we can move this around or turn it into a prefab and not have to worry about external bindings, go ahead and put the SpookyCube underneath the Target object in the hierarchy.
In the inspector for the VTI Target script, you can see several fields that are either empty or have placeholder values in them. Here are what each of the items on the Inspector represent and how they are used:
- ID: How VTI will keep track of this Target, and must be unique to any other Target in the scene. Think of it like the home address of your Target.
- Display Name: How the users will see this Target. It does not need to be unique (though it may still be a good idea so as not to be confusing), and is used in the VTI Companion App and when creating Channel Point Rewards.
- Description: A short sentence describing your Target's behavior and usage. It will show up on the VTI Companion App's editor, and on any Channel Point Rewards.
- Cooldown: How often, in seconds, that this Target can be fired. If this Target has been queued up multiple times, this is how long to wait in between each Event. Use this to make sure whatever your Target is doing is not interrupted or overlapped.
- Allow Message Input: Some Drivers support User Messaging, allowing Twitch viewers to send a message with their trigger. We will handle that later on in this tutorial.
- Allow Event Type Rebinding: Whether or not to allow users of the VTI Companion App to change how this Target is triggered. Most of the time, you can leave this on. However, if you have a very specific effect that needs to stay on a specific trigger, this is how you prevent changing the binding.
Go ahead and fill out all of that section. Next, note the Default Twitch Binding Settings below that. This is how you define what specific type of action on Twitch will cause this Target to go off. Every currently-supported event type is available in the Default Event Type drop down. When selecting an Event Type, the settings form below it will automatically change to match the Event's values.
For instance, let's say we want to have this trigger whenever someone donates more than 100 bits. To do that, we'd set the Event Type to CHEER and the Numeric Compare to GREATER_THAN (or GREATER_OR_EQUAL if you want 100 bits to work as well). If we wanted to change that to triggering whenever anyone cheers any amount, change the Numeric Compare to ANY. To note: When Allow Event Type Rebinding is enabled, these are your "Recommended" settings for the Target, and the VTI Companion App will use them until overwritten.
For now, though, we're going to put this onto CHANNEL_POINT_REDEEM so we can test this without spending money. Set that and then set the Channel Point Cost to 100.
Step 3: Adding Functionality
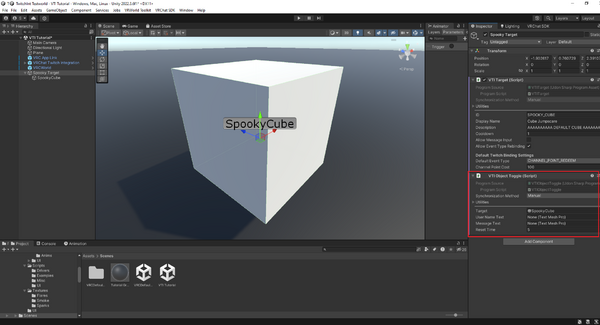
Finally, it's time to add in the Driver we picked out in Step 1. Simply add a new component and select the VTIObjectToggle script. Note that it has a few inputs of its own. The ones we care about for the moment are Target and Reset Time. Drag the "SpookyCube" GameObject into the Target input.
For Reset Time, we need to determine how long to keep the jumpscare visible for. For this tutorial, 5 seconds is perfectly fine. However, note how in the VTI Target component, the Cooldown is still set to 1. This can cause our Target to get double-triggered and can make it look weird. To fix this, just match the Cooldown input to the Reset Time input, though you may want to add in an extra second or two to Cooldown to allow for a little bit of a rest between scares. Don't want to give the Streamer a heart attack or anything.
And that's all that's required for a very basic Target! At this point, the SpookyCube Target is all ready to go, and you can build your World and give it a test.
Step 4: User Messaging
We may have a working Target at this point, but there is one feature we're not yet utilizing: User Messaging. This was mentioned and glossed over earlier in the tutorial, but now it's time that we add it on in. Looking at the documentation for VTIObjectToggle, we can see the Driver supports User Messaging by way of two TextMeshPro objects; one for UserName and one for Message.
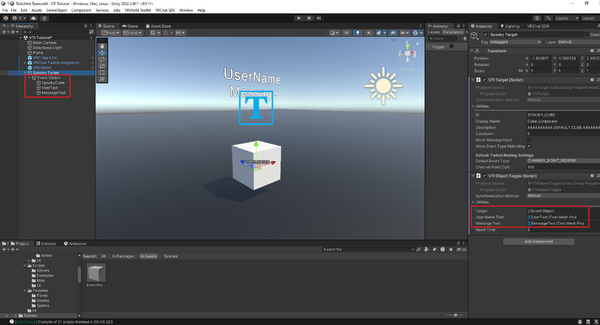
To add these in, we're first going to need to do a little adjustment to our hierarchy so we can turn everything on and off, rather than just our jumpscare cube. Create a new Empty with a name of your choice. I went with "Event Object", as this is the GameObject that we're going to make VTIObjectToggle turn on and off rather than SpookyCube itself. Move SpookyCube underneath that in the hierarchy.
Next, we need two TextMeshPro objects to contain our User Messaging. I have cheated here slightly and just copied the TextMeshPro objects out of the VTI Target - Event Firework example prefab. You can do that too, or go through the effort of setting everything up yourself if you so choose. I choose cheats. Put both of those under the new Empty we just made as well.
Now, go to the VTIObjectToggle component in Spooky Target and rebind Target to look at Event Object instead of SpookyCube. While we're here, also bind the UserText object to the User Name Text input, and MessageText to Message Text. Finally, in the VTI Target component, enabled Allow Message Input.
And we're done! When you go into Build and Test mode and link the VTI Companion App up to the World, the "Cube Jumpscare" redeem will now have a message input added to it automatically. And when activated, the SpookyCube will cause the Streamer to need a change of pants as well as showing who triggered the Event and a little message to rub salt in the wound.
As an final note, Allow Message Input is not required to show the UserName of the person who triggered this Target. If User Name Text is bound and Allow Message Input is disabled, just the UserName (and VTIObjectToggle's "Event Verb") will be displayed!
Closing
That's about all there is to creating your own VTI Targets. The VTI World Kit has been created in a way that should allow World Creators to easily create with it with only minimal fuss. As mentioned at the start, the majority of custom VTI Targets should be able to be created using the Drivers supplied by the VTI World Kit.
However, if you would like to dig a little deeper and learn how to create more complex functionality using code, read the next tutorial: Creating Custom VTI Drivers.


